
前言#
延續上篇 [JavaScript] axios 初探(一):基本用法、axios instance 與 URL 編碼處理,這篇要介紹的是 axios 針對請求和回應資料的轉換,以及預設的錯誤狀態處理。
此篇 axios 範例與原始碼版本使用 v1.8.4
axios 請求與回應的資料轉換#
首先簡要看一下 axios 在請求與回應的資料轉換上幫我們做了什麼?
- 請求轉換 (
transformRequest)- 會在發送請求前執行,如自動
JSON.stringify(data)
- 會在發送請求前執行,如自動
- 回應轉換 (
transformResponse)- 會在收到回應時執行,如自動
JSON.parse(response.data)
- 會在收到回應時執行,如自動
- 使用者可透過 config 傳入自定義的
transformRequest或transformResponsefunction
fetch 與 axios 範例#
用 fetch 和 axios 簡單範例來看 axios 自動做了哪些事。這裡一樣是用我自己寫的 local server 來控制 server 端的邏輯和回應的內容,server 端程式碼請點此,而 fetch 和 axios 的範例程式碼也可點此來看完整內容~
1. axios:直接以物件傳送請求資料(data)#
第一個範例是以 axios 發送 post 請求時,我們要帶請求的資料過去,但我們是直接將帶上物件格式的資料,看看 axios 會不會幫我們處理~
async function axiosPostJson() {  const data = {    name: 'John Doe',    age: 30,    city: 'New York',  };  const response = await axios.post(`${API_URL}/json-request`, data);
  console.log('request data:', data);  console.log('response.data:', response.data);}
預設收到的回應是 server 能正確處理我們發出的資料,而實際 console 結果是如下,server 有正確接到資料、我們收到的回應也能正確顯示為物件:
request data: { name: 'John Doe', age: 30, city: 'New York'}response.data: { message: 'JSON request received', receivedData: { "name": "John Doe", "age": 30, "city": "New York" }}2. fetch:直接以物件傳送請求資料(data)#
接下來看看如果以 fetch 發請求並帶上資料,一樣直接帶上物件格式資料,看看會發生什麼事~
async function fetchPostJson() {  try {    const data = {      name: 'John Doe',      age: 30,      city: 'New York',    }
    const response = await fetch(`${API_URL}/json-request`, {      method: 'POST',      headers: {        'Content-Type': 'application/json',      },      body: data,    })
    const result = await response.json()    console.log('request data:', data)    console.log('response.json():', result)  } catch (error) {    console.error('Error posting JSON:', error)    throw error  }}
實際發出請求後會看到 POST http://localhost:3060/json-request 400 (Bad Request) 的錯誤,在 Network tab 可以看到 response 如下,顯示「SyntaxError: [object Object] is not valid JSON」,代表我們在 body 帶入的物件資料格式沒有轉換好。
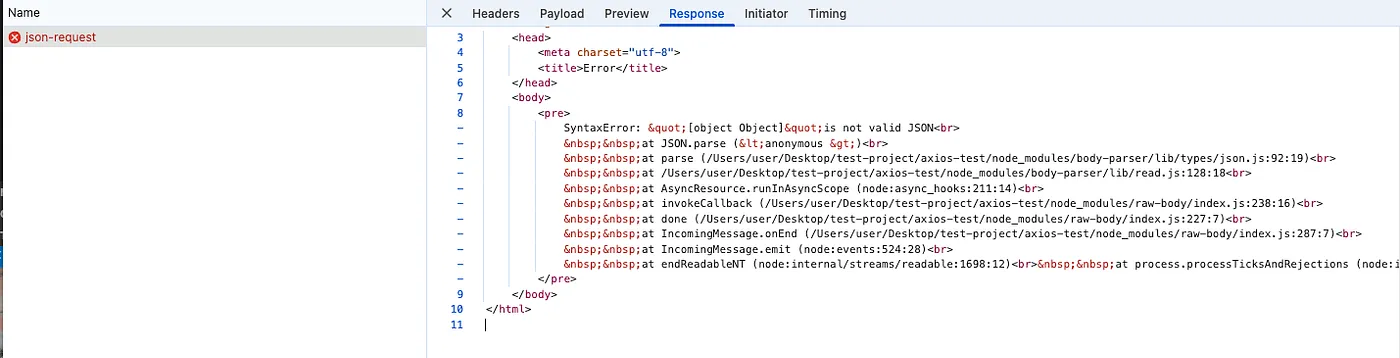
如果要成功請求,送出的資料要經過 JSON.stringify,且回來的資料要印出時,也要經過 response.json() 處理,而這就是 axios 幫我們自動處理、fetch 卻要手動處理的地方~
// fetch 要手動處理請求與回應資料的轉換async function fetchPostJson() {  const data = {    name: 'John Doe',    age: 30,    city: 'New York',  };
  const response = await fetch(`${API_URL}/json-request`, {    method: 'POST',    headers: {      'Content-Type': 'application/json',    },    body: JSON.stringify(data),  });
  const result = await response.json();  console.log('request data:', data);  console.log('response.json():', result);}
🔍 axios 原始碼#
axios 將請求與回應的資料轉換邏輯寫在 lib/defaults/index.js,分別為 transformRequest 和 transformResponse。在看詳細邏輯前,我想再看一次 axios 在什麼時候執行請求與回應的資料轉換。
axios 何時呼叫 transformRequest 和 transformResponse?#
當我們呼叫axios.get() 時,會經過以下流程:
- 請求會從 Axios class 的
_request方法出發(lib/core/Axios.js),這裡是處理所有請求的核心方法 - 在
_request中,處理完攔截器(interceptors)後,它會呼叫dispatchRequest:
_request(configOrUrl, config) { // 略 try { promise = dispatchRequest.call(this, newConfig); } catch (error) { return Promise.reject(error); } // 略}- 在
dispatchRequest(lib/core/dispatchRequest.js)中,它會先轉換請求資料:
config.data = transformData.call( config, config.transformRequest );- 在
transformData函式內,它會遍歷並應用所有的transform函式:
export default function transformData(fns, response) { const config = this || defaults; const context = response || config; const headers = AxiosHeaders.from(context.headers); let data = context.data;
 // Iterate through all transform functions utils.forEach(fns, function transform(fn) {   data = fn.call(config, data, headers.normalize(), response ? response.status : undefined); });
headers.normalize(); return data;}- 轉換請求資料完成後,
dispatchRequest(lib/core/dispatchRequest.js) 會取得該環境的 adapter (瀏覽器環境會選 XHR,Node.js 環境會選 HTTP),取得 adapter 後就會呼叫執行它:
export default function dispatchRequest(config) {    // 略    const adapter = adapters.getAdapter(config.adapter || defaults.adapter);      // adapter(config) 這裡就是在呼叫 adapter      return adapter(config).then(function onAdapterResolution(response) {        throwIfCancellationRequested(config);
        response.data = transformData.call(          config,          config.transformResponse,          response        );
        response.headers = AxiosHeaders.from(response.headers);
return response; } // 略}- 當收到 server 回應後,在
dispatchRequest內會轉換回應的資料:
adapter(config).then(// Success case function onAdapterResolution(response) { throwIfCancellationRequested(config);
// Transform response data response.data = transformData.call( config, config.transformResponse, response );
response.headers = AxiosHeaders.from(response.headers);
return response; }, // Error case, also gets transformed function onAdapterRejection(reason) { if (!isCancel(reason)) { throwIfCancellationRequested(config);
// Transform response data if (reason && reason.response) { reason.response.data = transformData.call( config, config.transformResponse, reason.response ); reason.response.headers = AxiosHeaders.from(reason.response.headers); } }
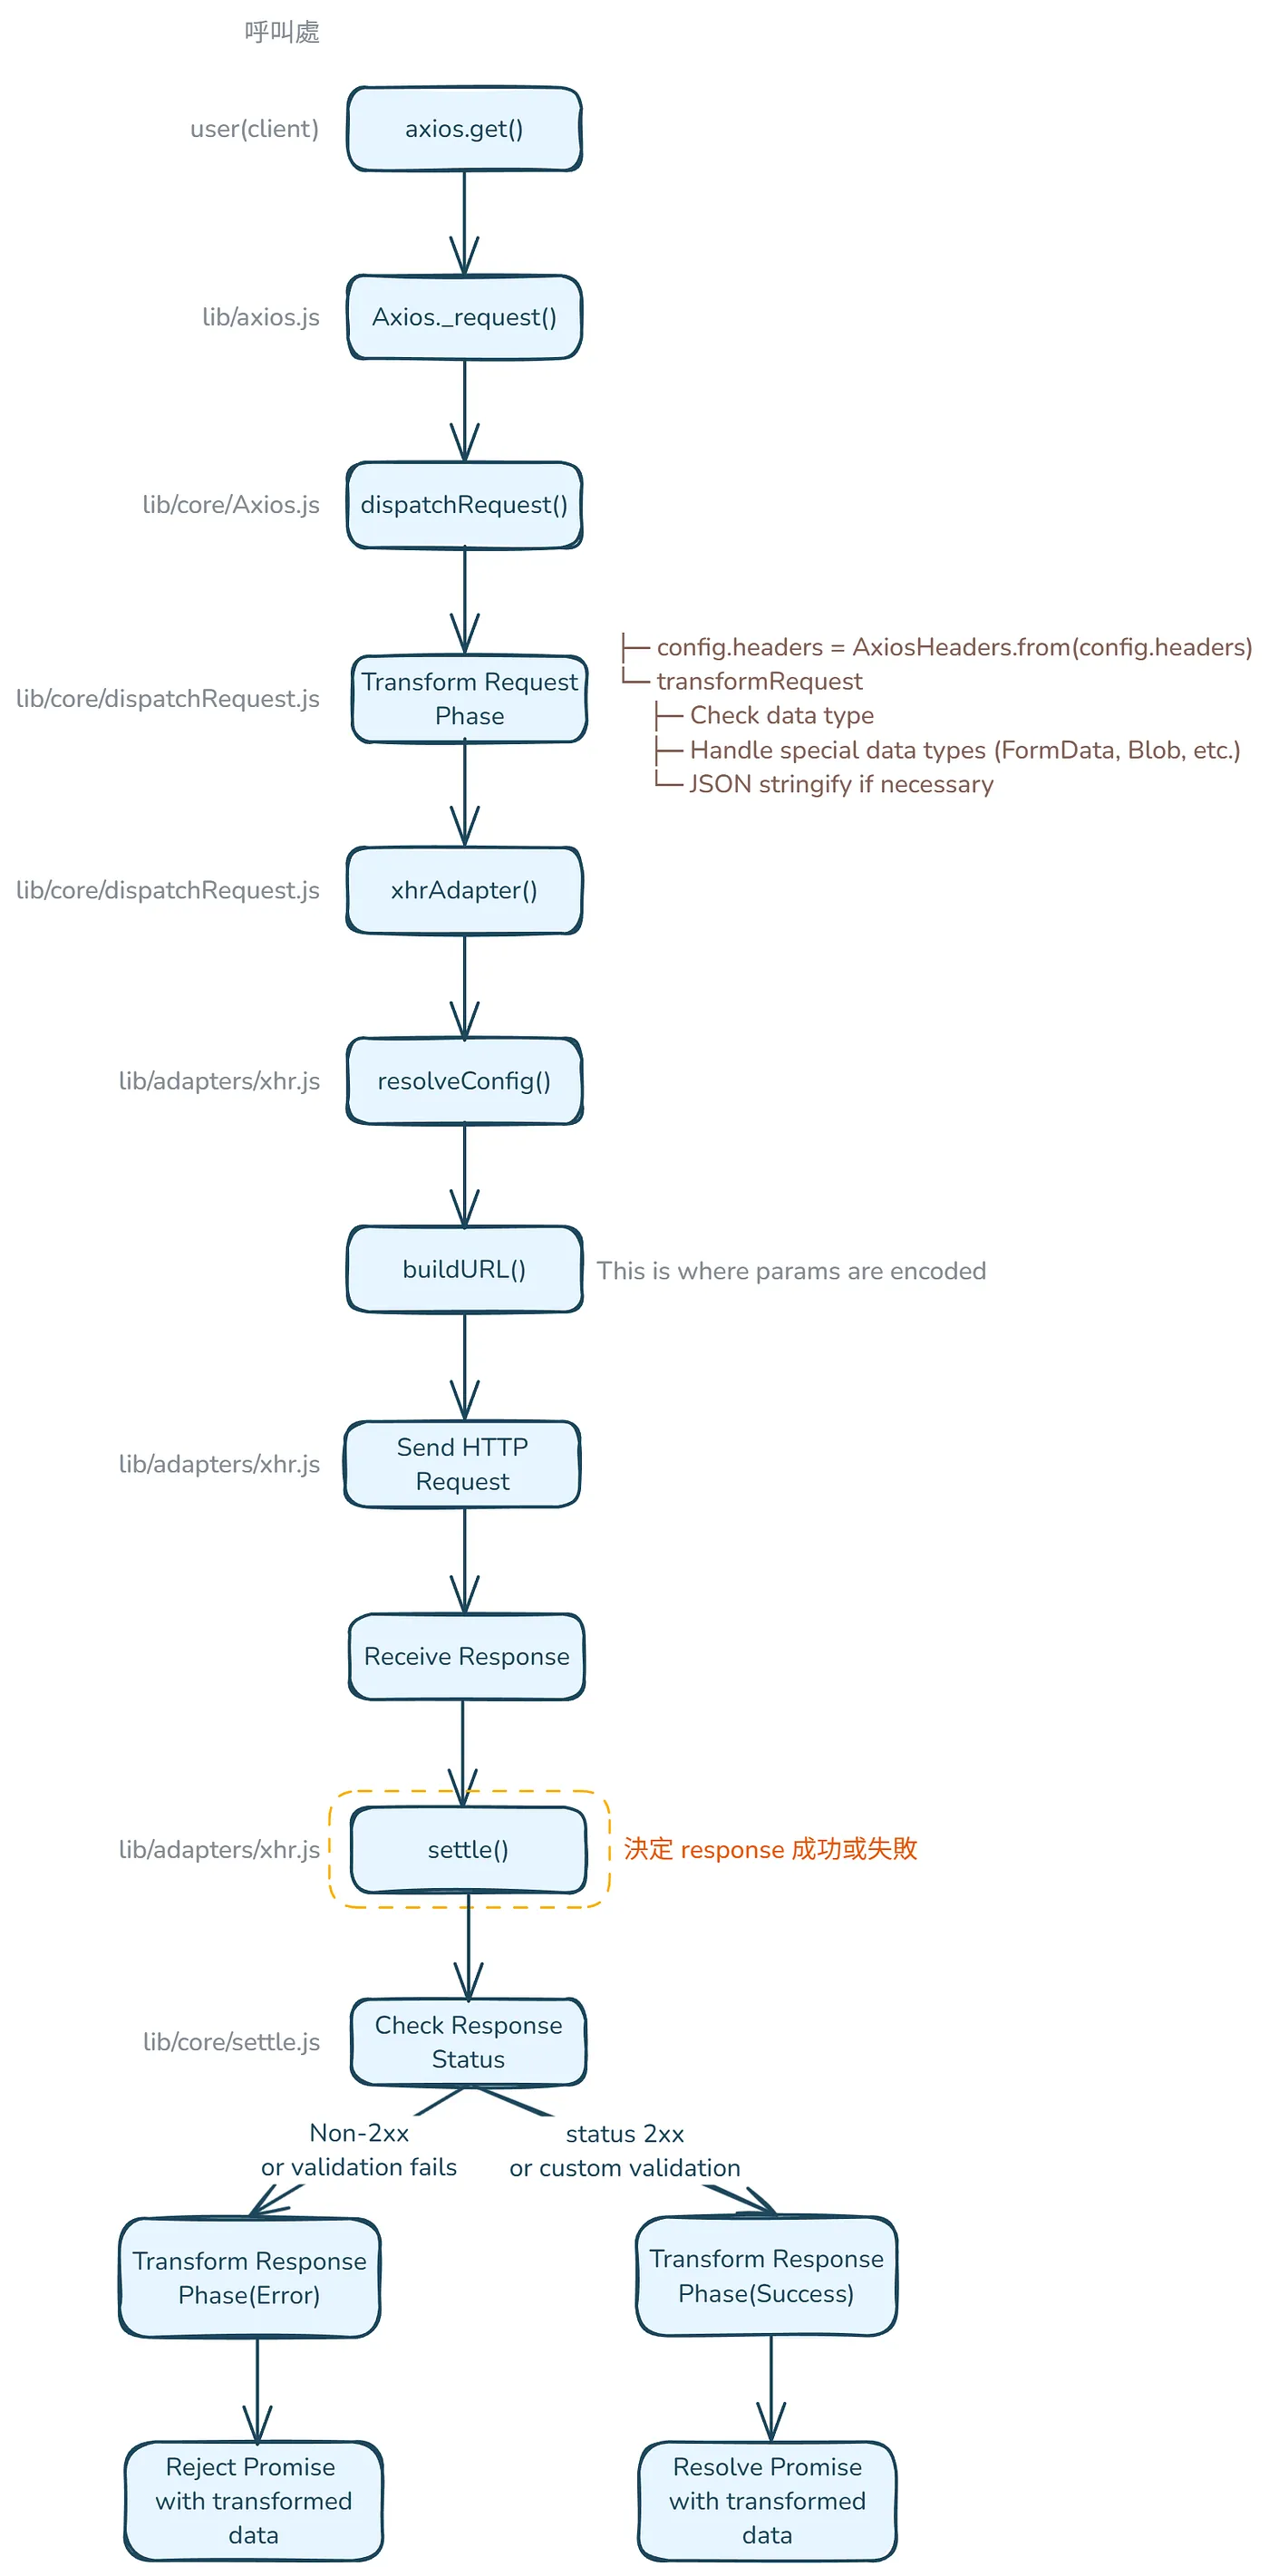
return Promise.reject(reason); })綜合上述,整個呼叫流程如下:
![]()
另外,transformRequest 和 transformResponse 都是作為參數傳入 transformData 函式處理的。
config.data = transformData.call(    config, // config 成為 transformData function 中的 this    config.transformRequest  // config.transformRequest 成為 transformData function 第一個參數 fns );
// lib/core/transformData.js function transformData(fns, response) {  const config = this || defaults;  // 'this' is the config passed via .call()  const context = response || config;  // since no response passed, context = config  const headers = AxiosHeaders.from(context.headers);  let data = context.data;  // gets the request data
  utils.forEach(fns, function transform(fn) { // 遍歷 fns 陣列中的每個 transform function    // 呼叫每個 function 並傳入要轉換的 data,normalized headers 以及 response status(或 undefined)    data = fn.call(config, data, headers.normalize(), response ? response.status : undefined);  });
  headers.normalize();  return data;}
axios 預設的 transformRequest 做了什麼?#
接著要詳細看看 transformRequest 裡寫了什麼~transformRequest 是一個 array,內有 transform function,axios 預設的 transformRequest 整體程式碼如下:
transformRequest: [function transformRequest(data, headers) {    const contentType = headers.getContentType() || '';    const hasJSONContentType = contentType.indexOf('application/json') > -1;    const isObjectPayload = utils.isObject(data);
    if (isObjectPayload && utils.isHTMLForm(data)) {      data = new FormData(data);    }
    const isFormData = utils.isFormData(data);
    if (isFormData) {      return hasJSONContentType ? JSON.stringify(formDataToJSON(data)) : data;    }
    if (utils.isArrayBuffer(data) ||      utils.isBuffer(data) ||      utils.isStream(data) ||      utils.isFile(data) ||      utils.isBlob(data) ||      utils.isReadableStream(data)    ) {      return data;    }    if (utils.isArrayBufferView(data)) {      return data.buffer;    }    if (utils.isURLSearchParams(data)) {      headers.setContentType('application/x-www-form-urlencoded;charset=utf-8', false);      return data.toString();    }
    let isFileList;
    if (isObjectPayload) {      if (contentType.indexOf('application/x-www-form-urlencoded') > -1) {        return toURLEncodedForm(data, this.formSerializer).toString();      }
      if ((isFileList = utils.isFileList(data)) || contentType.indexOf('multipart/form-data') > -1) {        const _FormData = this.env && this.env.FormData;
        return toFormData(          isFileList ? {'files[]': data} : data,          _FormData && new _FormData(),          this.formSerializer        );      }    }
    if (isObjectPayload || hasJSONContentType ) {      headers.setContentType('application/json', false);      return stringifySafely(data);    }
    return data;  }]
接著會分區段介紹每一段在做什麼,首先是初始檢查:
const contentType = headers.getContentType() || ''; // 從 headers 取得 content typeconst hasJSONContentType = contentType.indexOf('application/json') > -1; // 檢查是不是 JSON content typeconst isObjectPayload = utils.isObject(data); // 檢查 data 是否為 object接著處理 Form Data:
if (isObjectPayload && utils.isHTMLForm(data)) {    data = new FormData(data); // 將 HTML 表單轉換成 FormData  }
  const isFormData = utils.isFormData(data); // 檢查 data 是否為 FormData,FormData 通常用於:檔案上傳、表單提交、Multipart data
  if (isFormData) { // 如果是 FormData 實例    // 如果 content-type 是 application/json,將 FormData 轉換為普通物件,然後將物件轉換為 JSON 字串    // 如果 content-type 不是 application/json,保持 FormData 原樣,這在需要保持 multipart/form-data 格式的檔案上傳時很常見    return hasJSONContentType ? JSON.stringify(formDataToJSON(data)) : data;  }
接著處理 Binary Data Types:
if (utils.isArrayBuffer(data) || utils.isBuffer(data) || utils.isStream(data) || utils.isFile(data) || utils.isBlob(data) || utils.isReadableStream(data)) {// 直接回傳 binary data types return data;}這裡用了很多 isXXX 來確認 data 的 type,這確認方式就和上一篇提到的 isURLSearchParams 確認方式相同,是用 kindOfTest 去檢查 Object.prototype.toString 原始的結果。
另外小補充 binary data types 是什麼,binary data types 是 non-text 的資料形式,它會以 binary 的方式(1 和 0)表示資料。舉例來說 ArrayBuffer 可以這樣建立:
// Raw binary data bufferconst buffer = new ArrayBuffer(8); // 建立 8 bytes bufferaxios.post('/api/binary', buffer);ArrayBuffer 通常會用在聲音處理或 WebGL,它是一個固定長度的原始 binary data buffer。
回到 transformRequest,處理完 Binary Data Types 後,接著會處理特殊資料型別:
if (utils.isArrayBufferView(data)) { // 將 ArrayBufferView 轉換為 buffer return data.buffer;}if (utils.isURLSearchParams(data)) { // 將 URLSearchParams 轉換為 string headers.setContentType('application/x-www-form-urlencoded;charset=utf-8', false); return data.toString();}ArrayBufferView 代表的是 binary data 的 typed array views,而我們要取出 .buffer 是因為 ArrayBufferView 只是 ArrayBuffer 的 view,真正的 binary data 會存在 buffer 屬性中,而我們要的是 raw data,因此要透過 .buffer 取出資料。
下一段是處理物件資料:
if (isObjectPayload) {    // 將數據轉換為 URL 編碼格式    // 可以處理如:    // - 簡單數據:{ name: 'John' } → "name=John"    // - 嵌套物件:{ user: { name: 'John' } } → "user[name]=John"    // 使用場景:    // - 需要 URL 編碼數據的 API 端點    // - 傳統表單提交    // - 查詢參數    // - 舊系統兼容性    if (contentType.indexOf('application/x-www-form-urlencoded') > -1) {        return toURLEncodedForm(data, this.formSerializer).toString();    }
    // Multipart Form Data    // 使用場景:    // - 文件上傳(單個或多個文件)    // - 混合內容(文件和文本數據一起)    // - 二進制數據處理    // - 大型數據傳輸    // 無法通過 URL 編碼格式處理    if ((isFileList = utils.isFileList(data)) || contentType.indexOf('multipart/form-data') > -1) {        const _FormData = this.env && this.env.FormData; // 創建適當的 FormData 實例        return toFormData(            isFileList ? {'files[]': data} : data, // 處理文件陣列            _FormData && new _FormData(),  // 創建 FormData            this.formSerializer  // 序列化複雜數據        );    }}
接著最後一段~也是我們一開始想了解的,就是 JSON 格式的處理,axios 在這裡 stringify 我們的 json 資料,一般情況下,如果我們發送一個物件資料且沒有指定特殊的 content type(如 form-urlencoded 或 multipart/form-data),axios 就會使用此預設的 JSON 處理方式:
if (isObjectPayload || hasJSONContentType) { headers.setContentType('application/json', false); // 設定 JSON 的 content type header return stringifySafely(data); // 將物件 objects 轉為 JSON string}axios 預設的 transformResponse 做了什麼?#
接著看回應資料的轉換,transformResponse 寫了什麼~transformResponse 一樣是一個 array,內有 transform function,axios 預設的 transformResponse 整體程式碼與說明註解如下:
transformResponse: [function transformResponse(data) {    const transitional = this.transitional || defaults.transitional;    const forcedJSONParsing = transitional && transitional.forcedJSONParsing;    const JSONRequested = this.responseType === 'json';
    // 特殊資料類型:對於 Response 或 ReadableStream 直接回傳原始數據    if (utils.isResponse(data) || utils.isReadableStream(data)) {      return data;    }
    // JSON 解析    if (data && utils.isString(data) && ((forcedJSONParsing && !this.responseType) || JSONRequested)) {      const silentJSONParsing = transitional && transitional.silentJSONParsing; // 解析失敗時不拋出錯誤      const strictJSONParsing = !silentJSONParsing && JSONRequested; // 當請求 JSON 時,解析失敗會拋出錯誤
      try {  // 將 JSON 字串轉換為 JavaScript 物件        return JSON.parse(data);      } catch (e) {        if (strictJSONParsing) {          if (e.name === 'SyntaxError') {            throw AxiosError.from(e, AxiosError.ERR_BAD_RESPONSE, this, null, this.response);          }          throw e;        }      }    }
    // 默認:如果不需要轉換則直接回傳數據    return data;  }]
從上面可看出,axios 會從 silentJSONParsing 這參數來判斷,如果 JSON.parse(data) 轉換失敗時,要不要拋出錯誤,而預設 config 中 silentJSONParsing 是 true,因此預設 JSON.parse(data) 失敗時不會丟出錯誤(安靜爬取 JSON 的意思)。相關 config 如下:
// axios config(https://github.com/axios/axios)// transitional options for backward compatibility that may be removed in the newer versions  transitional: {    // silent JSON parsing mode    // `true`  - ignore JSON parsing errors and set response.data to null if parsing failed (old behaviour)    // `false` - throw SyntaxError if JSON parsing failed (Note: responseType must be set to 'json')    silentJSONParsing: true, // default value for the current Axios version
    // try to parse the response string as JSON even if `responseType` is not 'json'    forcedJSONParsing: true,
// throw ETIMEDOUT error instead of generic ECONNABORTED on request timeouts clarifyTimeoutError: false, },小結#
當我們呼叫像 axios.post 這樣的請求函式時,axios 會在發送請求前自動應用 transformRequest 來序列化請求資料(例如使用 JSON.stringify)。
在收到回應後,它會應用 transformResponse 來反序列化回應資料(例如使用 JSON.parse)。這些轉換都是由內部的 transformData 函式處理的,該函式會遍歷通過 config 傳入的轉換函式陣列。
axios 錯誤處理機制#
首先簡要看一下 axios 在錯誤處理上幫我們做了什麼?
validateStatus允許自訂錯誤判定標準(預設只接受2xx,非2xx一律視為錯誤)AxiosError內建錯誤類別,提供錯誤代碼、錯誤類型等欄位(如 code、response)catch(error)內部自動區分錯誤類型(網路錯誤、回應錯誤、請求錯誤)
fetch 與 axios 範例#
用 fetch 和 axios 簡單範例來看 axios 自動做了哪些事。這裡一樣是用我自己寫的 local server 來控制 server 端的邏輯和回應的內容,server 端程式碼請點此,而 fetch 和 axios 的範例程式碼也可點此來看完整內容~
1. axios:200 response#
以 axios 發送請求並收到 200 狀態碼的回應時,期待會走成功處理(try)的路線。
async function axiosSuccessResponse() { try { const response = await axios.get(`${API_URL}/success`) console.log('Success:', response.data) } catch (error) { console.log('Error:', error.response.data) }}實際 console 印出結果的確是成功處理的路線:
Success: { "status": "success", "data": { "message": "Operation successful" }}2. fetch:200 response#
以 fetch 發送請求並收到 200 狀態碼的回應時,期待會走成功處理(try)的路線。
async function fetchSuccessResponse() { try { const response = await fetch(`${API_URL}/success`) const data = await response.json() console.log('Success:', data) } catch (error) { console.log('Error:', error.message) }}實際 console 印出結果的確是成功處理的路線:
Success: { "status": "success", "data": { "message": "Operation successful" }}3. axios:404 response#
以 axios 發送請求並收到 404 狀態碼的回應時,期待會走失敗處理(catch)的路線。
async function axiosNotFoundError() { try { const response = await axios.get(`${API_URL}/not-found`) console.log('Success:', response.data) } catch (error) { console.log('Error:', error.response.data) }}實際 console 印出結果的確是失敗處理的路線:
Error: { "status": "error", "message": "Resource not found"}4. fetch:404 response#
以 fetch 發送請求並收到 404 狀態碼的回應時,期待會走失敗處理(catch)的路線。
async function fetchNotFoundError() { try { const response = await fetch(`${API_URL}/not-found`) const data = await response.json() console.log('Success:', data) } catch (error) { console.log('Error:', error.message) }}🔺 實際 console 印出結果卻是成功處理的路線!被視為請求成功:
Success: { "status": "error", "message": "Resource not found"}由上可看出,在遇到錯誤狀態碼時,axios 會自動幫我們拋出錯誤、讓我們走到錯誤處理的路線,但 fetch 不會。如果 fetch 要處理錯誤狀態碼,要自己手動判斷如下:
async function fetchServerError() {  try {    const response = await fetch(`${API_URL}/error`)
    // Fetch doesn't automatically throw errors for non-200 responses    // We need to check response.ok manually    if (!response.ok) {      const errorData = await response.json()      throw new Error(`${response.status} - ${errorData.message}`)    }
    const data = await response.json()    console.log('Success:', data)  } catch (error) {    console.log('Error:', error.message)  }}
🔍 axios 原始碼#
axios 預設的錯誤處理在 defaults/index.js 中的 validateStatus。
axios 何時呼叫 validateStatus?#
再次簡要看一下整個呼叫流程:
- 請求會從 Axios class 的
_request方法開始,並經過 dispatch 和 adapter 流程。 - 在
adapter(例如 xhr adapter)內部,收到請求的回應後會呼叫settle:
export default isXHRAdapterSupported && function (config) {    return new Promise(function dispatchXhrRequest(resolve, reject) {   // ... 建立請求 ...
   function onloadend() {     if (!request) {       return;     }     // 準備 response     const responseHeaders = AxiosHeaders.from(       'getAllResponseHeaders' in request && request.getAllResponseHeaders()     );     const responseData = !responseType || responseType === 'text' || responseType === 'json' ?       request.responseText : request.response;     const response = {       data: responseData,       status: request.status,       statusText: request.statusText,       headers: responseHeaders,       config,       request     };
     settle(function _resolve(value) {       resolve(value);       done();     }, function _reject(err) {       reject(err);       done();     }, response);
     // 清除 request     request = null;   }

   // ...
   // Use onloadend if available   request.onloadend = onloadend;
// ... });}- 在
settle中,它會使用validateStatus來判斷請求是成功還是失敗:
export default function settle(resolve, reject, response) { const validateStatus = response.config.validateStatus; if (!response.status || !validateStatus || validateStatus(response.status)) { resolve(response); } else { reject(new AxiosError( 'Request failed with status code ' + response.status, [AxiosError.ERR_BAD_REQUEST, AxiosError.ERR_BAD_RESPONSE][Math.floor(response.status / 100) - 4], response.config, response.request, response )); }}綜合上述,整個呼叫流程如下:
axios 預設的 validateStatus 做了什麼?#
validateStatus 函式會接收 HTTP 狀態碼作為參數,回傳 boolean 值決定這狀態碼是否代表成功:
validateStatus: function (status) { return status >= 200 && status < 300; // default}可看出預設認定 2xx 狀態碼為成功,而成功狀態碼的範圍也可以透過 config 讓使用者自定義:
axios.get('/api', { validateStatus: (status) => { return status < 500; // 將所有非 500 狀態視為成功 }})實際使用時,settle 函式會利用 validateStatus 判斷回應的狀態:
export default function settle(resolve, reject, response) {  const validateStatus = response.config.validateStatus;
  // 三種情況會 resolve:  // 1. !response.status:沒有狀態碼  // 2. !validateStatus:沒有驗證函數  // 3. validateStatus(response.status):驗證通過  if (!response.status || !validateStatus || validateStatus(response.status)) {    resolve(response);  } else {    // 驗證失敗,建立並回傳錯誤    reject(new AxiosError(      'Request failed with status code ' + response.status,      // 根據狀態碼決定錯誤類型:      // index 0: ERR_BAD_REQUEST  - 用於 4xx 錯誤      // index 1: ERR_BAD_RESPONSE - 用於 5xx 錯誤      // e.g. 404 經過 Math.floor(404 / 100) - 4 會得到 0,所以取 index 0 ERR_BAD_REQUEST;500  經過 Math.floor(404 / 100) - 4 會得到 1.所以取 index 1 ERR_BAD_RESPONSE      [AxiosError.ERR_BAD_REQUEST, AxiosError.ERR_BAD_RESPONSE][Math.floor(response.status / 100) - 4],      response.config,      response.request,      response    ));  }}
settle 接收三個參數,分別為:
resolve:Promise 的 resolve 函數reject:Promise 的 reject 函數response:HTTP 回應物件
接著它會決定這個請求 Promise 的結果:
- 使用
validateStatus檢查狀態碼 - 成功時呼叫
resolve(response) - 失敗時建立
AxiosError並呼叫reject
在錯誤處理時,也會依據狀態碼選擇錯誤類型,保留完整的請求和回應資訊。
小結#
當我們呼叫像 axios.get 這樣的請求函式時,axios 會通過 settle 函式來處理錯誤,該函式會驗證回應的狀態碼(預設將非 2xx 視為錯誤),並建立標準化的 AxiosError 物件。
它會像處理成功回應一樣轉換錯誤回應的數據,確保錯誤處理的一致性,並提供詳細的失敗資訊以便除錯。
其他 axios 功能#
這裡稍微列出這次沒提到的其他 axios 功能,有機會也可以爬原始碼研究看看~其他 axios 功能如:
- 攔截器(Interceptors)處理
- 請求取消(Cancellation)
- 超時(timeout)處理
- 上傳、下載進度追蹤(
onUploadProgress、onDownloadProgress) - XSRF 保護(xsrfCookieName/xsrfHeaderName)
- …等更多
axios 請求/回應流程#
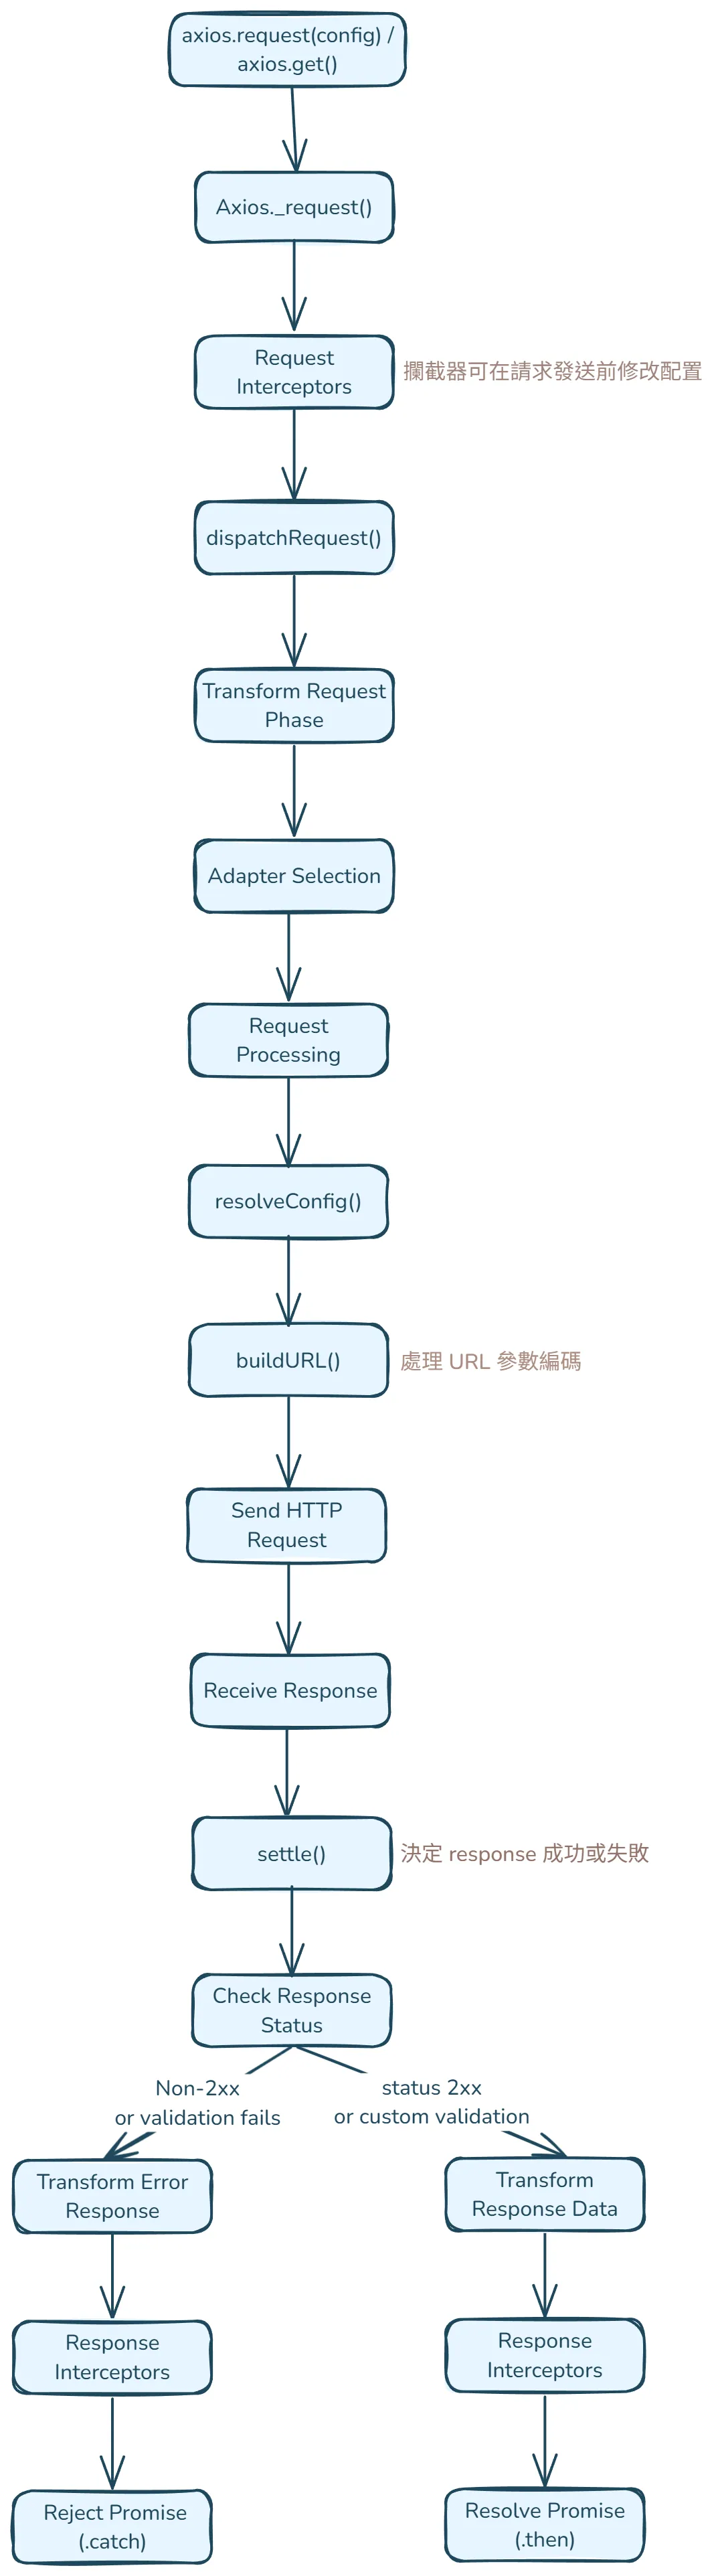
最後統整一次 axios 發出請求後的流程圖,來看每一個功能是在哪步驟出現~
補充:DeepWiki axios#
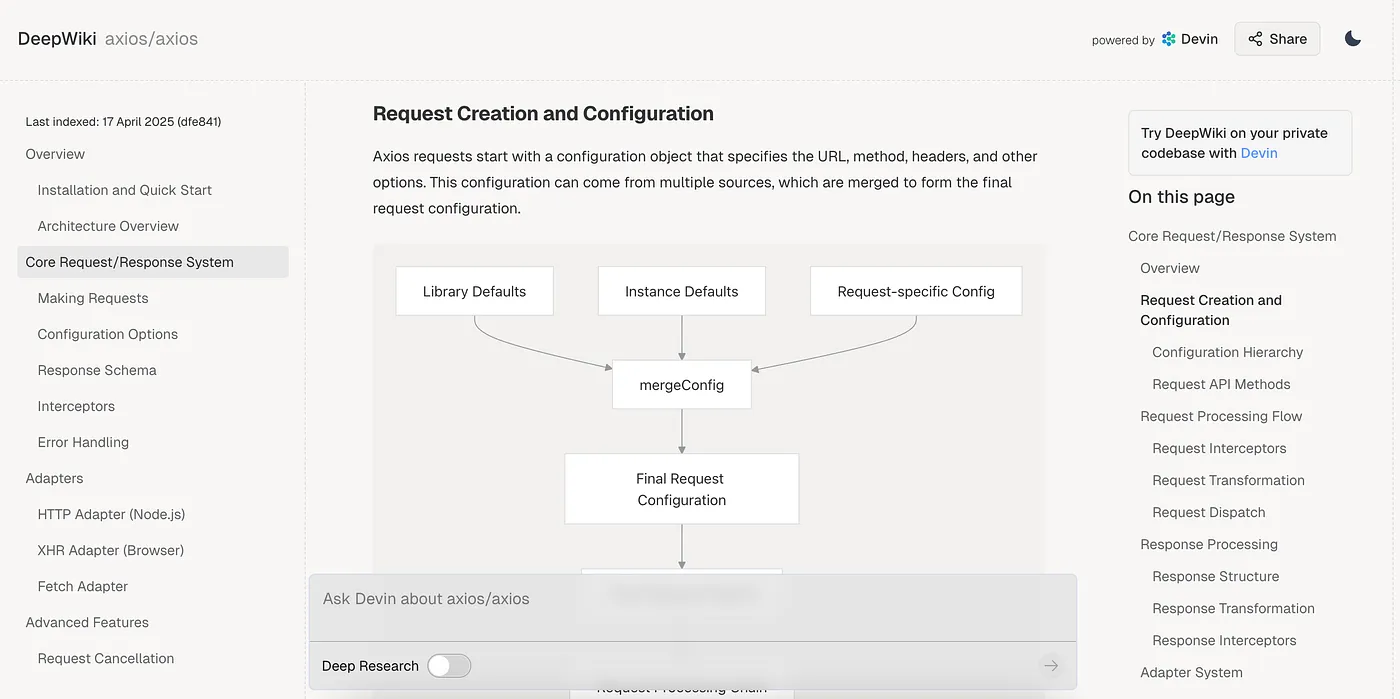
有了 AI 後理解 axios 原始碼變得容易許多,我原本是 clone axios 整個 github 專案,再請 cursor 幫我爬原始碼來追蹤特定功能是在哪裡實現,這已經表現足夠好了,後來發現有個更厲害的 AI 工具,也就是 DeepWiki~它可以爬任何開源的 github 專案,只要將 github 網址放入 https://deepwiki.com/ 後面,就可以爬開源專案並告訴你這專案大致的內容與功能!舉例來說 axios 的 github 網址是 https://github.com/axios/axios,只要將 https://github.com/ 替換成 https://deepwiki.com/,變成 https://deepwiki.com/axios/axios,就可以從這網址看 axios 各功能的介紹、還可以互動式提問!超讚的…太晚發現了,總之十分推薦有興趣的人可以去看看!尤其在 axios 處理請求的流程講得蠻完整的,可以用比較大局觀去看整個流程~
Reference:#
如有任何問題歡迎聯絡、不吝指教✍️