前言#
有一陣子沒寫文章了,其實有幾個想記錄下來的內容,原本還想先架個自己的部落格,但這陣子真的太忙了…,只好先繼續在 Medium 寫 🧐~
這次會想寫 axios,是因為之前參加資安讀書會時,有討論到 axios 會自動幫我們做編碼處理。當時 Huli 大大也提到,有空可以去看看這些套件到底幫我們做了哪些事。我覺得這個方向滿有趣的,既可以了解背後的運作,也能更清楚自己用的工具在做什麼,所以就決定來研究看看 axios 幫我們做了什麼。不過 axios 功能很多,因為時間有限,我只挑了幾個功能來看,搭配原始碼稍微研究一下。沒辦法涵蓋全部細節,如果文章中有任何錯誤或可以補充的地方,也歡迎不吝指正!(研究 axios 時發現 Alex 大寫的 axios 深入淺出系列非常仔細,很推薦對 axios 有興趣的人閱讀)
此篇主要介紹 axios 基本用法、axios instance 和 URL 編碼處理邏輯。
什麼是 axios?#
axios 是一個基於 Promise 的 HTTP 客戶端,提供比原生 fetch 更友善的 API,它支援瀏覽器與 Node.js,內建許多方便的功能,如請求/回應攔截器、錯誤處理、取消請求等。我覺得應該是前端工程師都會知道的套件 XD
而 axios 與原生 fetch 的差異網路上也有很多文章介紹了,以下簡要以表格列出幾個不同的地方:
| 特性 | Axios | fetch |
|---|---|---|
| 自動 JSON 解析 | ✅ 是 | ❌ 否 (需 res.json()) |
| Request 攔截器 | ✅ 是 | ❌ 否 |
| Response 攔截器 | ✅ 是 | ❌ 否 |
| 自動 params 處理 | ✅ 是 | ❌ 否 |
| 內建錯誤處理 | ✅ 是 | ❌ 需要手動處理 |
axios 基本使用方式#
此篇 axios 範例與原始碼版本使用 v1.8.4
參考官方文件,以 axios 發送請求的方式有很多種,可主要分為兩類:
1. 直接用 axios 請求#
axios(config)
axios({ method: 'get', url: 'https://jsonplaceholder.typicode.com/posts/1', headers: { 'X-Custom-Header': 'foobar' },}) .then(response => console.log(response.data)) .catch(error => console.error(error))axios(url[, config])
axios('https://jsonplaceholder.typicode.com/posts/1', { headers: { 'X-Custom-Header': 'foobar' },}) .then(response => console.log(response.data)) .catch(error => console.error(error))axios.requestMethod
axios.get('https://jsonplaceholder.typicode.com/posts/1') .then(response => console.log(response.data)) .catch(error => console.error(error));2. 建立 axios instance 來請求#
const apiClient = axios.create({ baseURL: 'https://jsonplaceholder.typicode.com', timeout: 5000, headers: { 'X-Custom-Header': 'foobar' }});apiClient.get('/posts/1').then(res => console.log(res.data));🔍 axios 原始碼#
而當我們使用 axios 的時候,到底它背後是什麼呢~這裡就要來看看原始碼。axios 會在 lib/axios.js 被匯出,接下來分區塊來看看 axios.js 寫了什麼~
1. createInstance 函式#
首先它定義了 createInstance 函式,程式碼如下:
function createInstance(defaultConfig) {  const context = new Axios(defaultConfig); //  creates a new Axios instance  const instance = bind(Axios.prototype.request, context); // creates a bound function using the bind method, This creates a function that will call Axios.prototype.request with the correct this context.
  // Copy axios.prototype to instance  utils.extend(instance, Axios.prototype, context, { allOwnKeys: true });  // Copy context to instance  utils.extend(instance, context, null, { allOwnKeys: true });
  // Factory for creating new instances  instance.create = function create(instanceConfig) {    return createInstance(mergeConfig(defaultConfig, instanceConfig));  };  return instance; //  instance is both a function AND an object}
createInstance 是用來建立 axios instance 的函式,步驟包括:
- 擴展 instance,使其擁有 axios 原型鏈上的所有方法和屬性,讓 instance 可直接使用如 get、post 等方法。
- 擴展 instance,使其擁有 context 本身的所有屬性,確保 instance 擁有必要的配置和狀態
- 定義
instance.create方法:此方法會基於當前的配置,建立新的 Axios instance,並合併新的配置。簡要來說,當我們呼叫axios.create時就會建立新的 instance,會將我們想要的 config 合併預設 config 來建立 - 回傳
instance,此instance是一個 function 也是 object。因為是 function,所以可以用axios(config)的方式來呼叫並送出請求;而因為它也是 object,所以也可用axios.get()、axios.post()等方式來送出請求
另外,因為 const instance = bind(Axios.prototype.request, context) 這裡綁定了 Axios.prototype.request,因此當我們呼叫 axios({config}) 時,等同於執行 Axios.prototype.request.bind(context)({config}),也就是在執行 Axios request 方法。那為何可以用 axios.get 呼叫請求?axios 不是一個 function 嗎?這裡推薦閱讀 深入淺出 axios(一):預設 axios 物件、Axios 類別、攔截器 有更多說明。
2. 建立預設的 axios 實例#
axios.js 中的下個區塊以預設配置 defaults 建立了一個 axios instance,此 instance 就是我們直接使用的 axios 全局物件:
const axios = createInstance(defaults);3. 擴展 axios instance,添加其他屬性和方法#
接著它擴展全局 axios instance,增加一些屬性和方法:
// ...axios.spread = spread;
// Expose isAxiosErroraxios.isAxiosError = isAxiosError;
// Expose mergeConfigaxios.mergeConfig = mergeConfig;
axios.AxiosHeaders = AxiosHeaders;// ..
再來想補充,因為 深入淺出 axios(一):預設 axios 物件、Axios 類別、攔截器 這篇文章內,有從 index.d.ts 看預設 axios instance 和 axios.create 回傳的 instance 的差異,而自己有些不同的發現,因此也稍微筆記一下~
在 index.d.ts 中,全局 axios 的 type 定義為 AxiosStatic:
export interface AxiosStatic extends AxiosInstance {  create(config?: CreateAxiosDefaults): AxiosInstance;  Cancel: CancelStatic;  CancelToken: CancelTokenStatic;  Axios: typeof Axios;  AxiosError: typeof AxiosError;  HttpStatusCode: typeof HttpStatusCode;  readonly VERSION: string;  isCancel: typeof isCancel;  all: typeof all;  spread: typeof spread;  isAxiosError: typeof isAxiosError;  toFormData: typeof toFormData;  formToJSON: typeof formToJSON;  getAdapter: typeof getAdapter;  CanceledError: typeof CanceledError;  AxiosHeaders: typeof AxiosHeaders;  mergeConfig: typeof mergeConfig;}
declare const axios: AxiosStatic;
而 axios.create 回傳的 instance 的 type 定義為 AxiosInstance:
export interface AxiosInstance extends Axios {  <T = any, R = AxiosResponse<T>, D = any>(config: AxiosRequestConfig<D>): Promise<R>;  <T = any, R = AxiosResponse<T>, D = any>(url: string, config?: AxiosRequestConfig<D>): Promise<R>;
defaults: Omit<AxiosDefaults, 'headers'> & { headers: HeadersDefaults & { [key: string]: AxiosHeaderValue } };}由上可看出,AxiosInstance 沒有 isCancel()、 isAxiosError() 等方法可以用、不能取得 Cancel、CancelToken、HttpStatusCode 等屬性。對應上面 lib/axios.js 的程式碼,是因為 AxiosInstance 少了上述步驟 3 擴展全局 axios instance 的部分。
另外, AxiosInstance 在型別裡沒有定義 create 方法,那 axios.create 回傳的 instance 可以再呼叫 create 方法嗎?
單純以 TypeScript 型別來看,使用 AxiosInstance.create 會報錯:

但是在 JavaScript 邏輯上,使用 AxiosInstance.create 仍然可執行!原因是 axios.create 會呼叫 createInstance ,而createInstance 內就是有指派 function 給 instance.create。因此邏輯上是可以順利執行的,只是 axios 在型別上沒有明寫,我猜是希望大家盡量不要這樣做吧~
const instance1 = axios.create({ baseURL: 'https://jsonplaceholder.typicode.com', timeout: 5000, headers: { 'X-Custom-Header': 'foobar' },})const instance2 = instance1.create({ baseURL: 'https://jsonplaceholder.typicode.com', timeout: 5000, headers: { 'X-Custom-Header': 'foobar' },})instance2.get('/posts/1').then(res => console.log(res.data)) // 可順利印出資料另外還有一段核心的程式碼,就是 Axios class ,其內部實作在 lib/core/Axios.js,但不是這次想聚焦的內容,因此不細講。
Axios URL 編碼處理#
接著介紹 axios 幫我們做的編碼處理,首先簡要看一下 axios 在 URL 編碼上幫我們做了什麼?
params物件會自動轉換為查詢字串- 預設使用
encodeURIComponent編碼 - 支援
paramsSerializer來客製化
fetch 與 axios 範例#
用 fetch 和 axios 的範例程式碼來看看 axios 自動做了哪些事。這裡我有自己寫個 local server 來控制 server 端的邏輯和回應的內容,server 端程式碼請點此,而 fetch 和 axios 的範例程式碼也可點此來看完整內容~
1. axios:直接將參數放在 url 中#
第一個範例是使用 axios 請求時,將參數直接寫在 url 中,看看 axios 會不會自動為我們編碼:
async function axiosParamsInUrl() { const search = 'hello world!'; const symbol = '&$'; const response = await axios.get( `${API_URL}/url-encoded?search=${search}&symbol=${symbol}` ); console.log(response.data);}預設 server 端應該會收到 search 和 symbol 2個欄位的參數,但是 server 收到的卻是 3 個欄位的參數:
receivedQuery: { search: 'hello world!', symbol: '', $: ''}因為 & 的關係,被 server 以爲是要連接第三個欄位的參數,由此可知,將參數直接寫在 url 中,axios 是不會幫我們自動編碼的。
2. axios:將參數放在 params 欄位#
第二個範例是使用 axios 請求時,將參數寫在請求的 config 中,看看 axios 會不會自動為我們編碼:
async function axiosAutoEncodeParams() { const search = 'hello world!'; const symbol = '&$'; const response = await axios.get(`${API_URL}/url-encoded`, { params: { search, symbol }, }); console.log(response.data);}預設 server 端應該會收到 search 和 symbol 2個欄位的參數,而 server 端真的是收到 2 個欄位的參數:
receivedQuery: { search: 'hello world!', symbol: '&$'}由此可知,將參數寫在 config 的 params 欄位中,axios 會幫我們自動編碼 👌。
3. fetch:直接將參數放在 url 中#
第三個範例看看用 fetch 請求時,如果直接將參數放上 url,它會自動編碼嗎?
async function fetchWithoutEncode() { const search = 'hello world!'; const symbol = '&$'; const res = await fetch( `${API_URL}/url-encoded?search=${search}&symbol=${symbol}` ); const data = await res.json(); console.log(data);}答案是:不會,server 會以為收到 3 個欄位的參數:
receivedQuery: { search: 'hello world!', symbol: '', $: ''}4. fetch:手動為參數編碼#
因為 fetch 不會自動為我們編碼,因此我們需要以 encodeURIComponent 來手動編碼:
async function fetchManualEncode() { const search = 'hello world!'; const symbol = '&$'; const res = await fetch( `${API_URL}/url-encoded?search=${encodeURIComponent( search )}&symbol=${encodeURIComponent(symbol)}` ); const data = await res.json(); console.log(data);}此時 server 就可正確辨識為 2 個欄位的參數:
receivedQuery: { search: 'hello world!', symbol: '&$'}🔍 axios 原始碼#
axios 是在哪裡做了編碼的邏輯呢~?axios URL 編碼邏輯在在 lib/helpers/buildURL.js。
axios 何時呼叫 buildURL?#
我想了解使用 axios 發請求時,它是在什麼時候呼叫 buildURL 來處理編碼邏輯的,因此稍微追了一下流程,說明如下。
當我們呼叫axios.get() 時,會經過以下流程:
- 請求會從 Axios class 的
_request方法出發(lib/core/Axios.js),這裡是處理所有請求的核心方法 - 在
_request中,處理完攔截器(interceptors)後,它會呼叫dispatchRequest:
_request(configOrUrl, config) { // 略 try { promise = dispatchRequest.call(this, newConfig); } catch (error) { return Promise.reject(error); } // 略}dispatchRequest(lib/core/dispatchRequest.js) 會取得該環境的 adapter (瀏覽器環境會選 XHR,Node.js 環境會選 HTTP),取得 adapter 後就會呼叫執行它:
export default function dispatchRequest(config) {    // 略    const adapter = adapters.getAdapter(config.adapter || defaults.adapter);      // adapter(config) 這裡就是在呼叫 adapter      return adapter(config).then(function onAdapterResolution(response) {        throwIfCancellationRequested(config);
        response.data = transformData.call(          config,          config.transformResponse,          response        );
        response.headers = AxiosHeaders.from(response.headers);
return response; } // 略}- 如果在瀏覽器環境,它會使用 XHR adapter (
lib/adapters/xhr.js),而 XHR adapter 第一件做的事就是呼叫resolveConfig
function (config) { return new Promise(function dispatchXhrRequest(resolve, reject) { const _config = resolveConfig(config); // 略});}resolveConfig(lib/helpers/resolveConfig.js) 就是呼叫 buildURL 的地方,這裡就會處理和編碼 params:
export default (config) => {// 略 newConfig.url = buildURL( buildFullPath(newConfig.baseURL, newConfig.url, newConfig.allowAbsoluteUrls), config.params, config.paramsSerializer );// 略}綜合上述,整個呼叫流程如下:
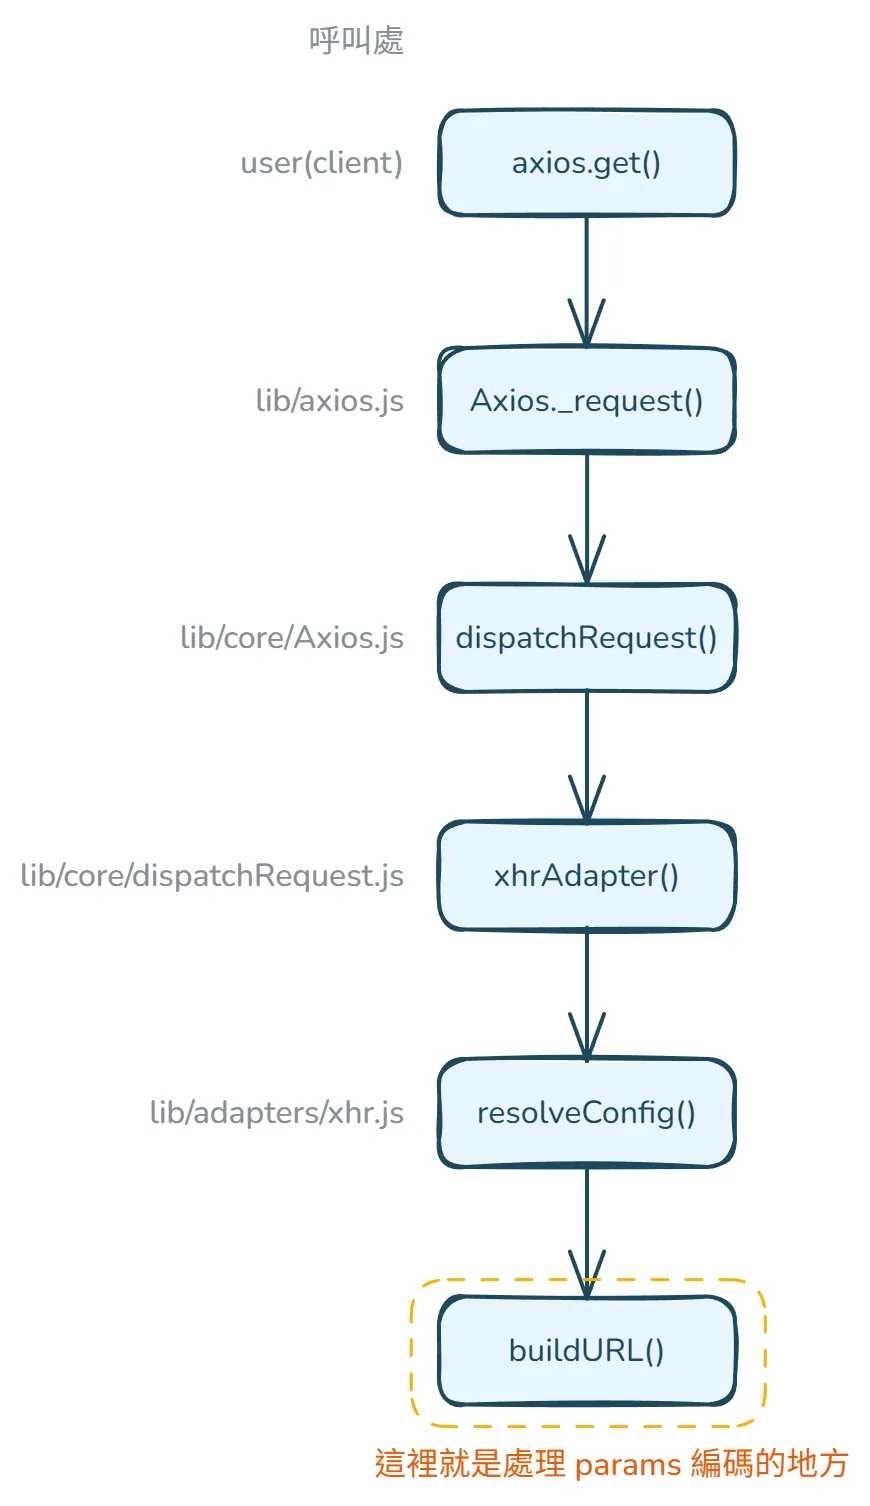
buildURL 的呼叫鏈示意圖buildURL 做了什麼?#
接著來看看 buildURL這函式內部做了什麼吧,此函式的目的是接收一個base URL,然後加上編碼(encode)過後的 query parameters 並回傳。
buildURL函式接受的參數是:
url: base URL,例如:"http://www.google.com"params: 一個物件,裡面是要加入 URL 的 query parametersoptions: 可選的設置值,用來客製化 encode/serialize 參數的方式,這個值可以是物件,物件內包含 serialize 函式或 encode 函式,也可以直接傳一個 serialize 函式
buildURL 程式碼與說明如下:
/** * Build a URL by appending params to the end * * @param {string} url The base of the url (e.g., http://www.google.com) * @param {object} [params] The params to be appended * @param {?(object|Function)} options * * @returns {string} The formatted url */export default function buildURL(url, params, options) {  /*eslint no-param-reassign:0*/  if (!params) { // 如果沒有提供 params,就直接回傳原本的 URL,這也說明了為何在 axios.get(url) 放上的 params 不會被編碼,要將參數放在 axios config 的 params 欄位內才會編碼    return url;  }
  const _encode = options && options.encode || encode; // 如果有傳入 options.encode,就使用它;否則就用內建的 encode 函式
  if (utils.isFunction(options)) { // 如果 options 傳進來是一個函式(例如自訂的 serialize),會把它轉成 { serialize: fn } 格式    options = {      serialize: options    };  }
  const serializeFn = options && options.serialize;
  let serializedParams;
  if (serializeFn) {    serializedParams = serializeFn(params, options); // 如果有自訂的 serialize 函式,就使用該 function 處理 params  } else {    serializedParams = utils.isURLSearchParams(params) ? // 如果是 URLSearchParams instance,直接呼叫 .toString(),代表開發者已經自己將 params 做好轉換,axios 不用再處理      params.toString() :      new AxiosURLSearchParams(params, options).toString(_encode); // 使用 Axios 自己的 AxiosURLSearchParams 類別來處理  }
  if (serializedParams) { // 如果有序列化後的參數    const hashmarkIndex = url.indexOf("#"); // 尋找 URL 中的 # 符號位置
    if (hashmarkIndex !== -1) { // 如果找到 # 符號,就移除 # 及其後面的內容      url = url.slice(0, hashmarkIndex);    }    //  根據 URL 是否已有查詢參數來決定使用 ? 或 & 來連接新參數,例如 url 是 https://example.com/search?type=user 就是用 & 繼續加後面的參數    url += (url.indexOf('?') === -1 ? '?' : '&') + serializedParams;  }
  return url;}
從上面可看出 axios 自己處理 params 編碼的邏輯在 AxiosURLSearchParams,那 AxiosURLSearchParams 又做了什麼呢?
AxiosURLSearchParams 是一個 axios 自己的 class,用來將 parameters 轉換為編碼過的 query strings,以下為程式碼與說明。
/** * It takes a params object and converts it to a FormData object * * @param {Object<string, any>} params - The parameters to be converted to a FormData object. * @param {Object<string, any>} options - The options object passed to the Axios constructor. * * @returns {void} */function AxiosURLSearchParams(params, options) {  this._pairs = []; // 初始化 key-value pairs  params && toFormData(params, this, options); // 如果有 params 就呼叫 toFormData,toFormData 會呼叫 append 將 key-pairs 加入 _pairs 陣列}
const prototype = AxiosURLSearchParams.prototype;
prototype.append = function append(name, value) { // 定義 append 方法,將新的 key-value pair 新增到內部的 pairs 陣列  this._pairs.push([name, value]);};
prototype.toString = function toString(encoder) { // 定義 toString 方法,將所有 pairs 轉換為 URL-encoded string  const _encode = encoder ? function(value) { // 如果 toString 參數有指定 encoder,就回傳此 custom encoder, encoder.call(this, value, encode) 允許 custom encoder 存取要 encode 的 value 和 axios 預設的 encode function    return encoder.call(this, value, encode);  } : encode; // 沒有指定 encoder,就使用預設 encode function
  return this._pairs.map(function each(pair) { // 遍歷 pairs 陣列,對每個 pair 操作:Encodes the key (pair[0])、Adds an equals sign (=)、Encodes the value (pair[1]),最後用 & 連接每個 encoded pairs    return _encode(pair[0]) + '=' + _encode(pair[1]);  }, '').join('&');};
可以看到它會對 params 的 key 和 value 做 encode,如果沒指定編碼的 function,就會用 axios 預設的 encode function。axios 的預設 encode function 如下:
/** * It encodes a string by replacing all characters that are not in the unreserved set with * their percent-encoded equivalents * * @param {string} str - The string to encode. * * @returns {string} The encoded string. */function encode(str) { const charMap = { '!': '%21', // 驚嘆號在某些伺服器可能被解釋為特殊命令 "'": '%27', // 單引號可能導致 SQL 注入或 XSS 攻擊 '(': '%28', // 括號在某些查詢語言中有特殊含義 ')': '%29', '~': '%7E', // 波浪號在某些系統中用於表示根目錄 '%20': '+', // 使用 + 表示空格,是 URL 查詢參數的常見慣例 '%00': '\x00' // 空字節需要特殊處理以防止安全漏洞 }; // 呼叫 encodeURIComponent 做基本編碼,接著針對特定字元再用 charMap 進一步處理 return encodeURIComponent(str).replace(/[!'()~]|%20|%00/g, function replacer(match) { return charMap[match]; });}由此可知,呼叫 axios 的 encode function 和呼叫原生 encodeURIComponent function 的編碼結果可能會不同,舉例如下。
// 1. 空格的處理const text1 = "Hello World";encodeURIComponent(text1)  // Hello%20Worldencode(text1)  // Hello+World
// 2. 特殊字元的處理const text2 = "test!()'~";encodeURIComponent(text2)  // test!()'~encode(text2) // test%21%28%29%27%7E
回到 AxiosURLSearchParams,AxiosURLSearchParams 的使用範例如下,可以看到它會將 params 物件拼成 URL 查詢參數:
const params = { name: 'John Doe', age: 30,};const serializedParams = new AxiosURLSearchParams(params).toString(_encode);// serializedParams 會是 "name=John+Doe&age=30"補充:isURLSearchParams 做了什麼?#
接著想補充一下,在 buildURL 有看到,axios 用isURLSearchParams 判斷 params 是否為 URLSearchParams instance,那 isURLSearchParams 是做了什麼、怎麼判斷呢?
isURLSearchParams函式定義在 lib/utils.js,程式碼如下。
/** * Determine if a value is a URLSearchParams object * * @param {*} val The value to test * * @returns {boolean} True if value is a URLSearchParams object, otherwise false */const isURLSearchParams = kindOfTest('URLSearchParams');kindOfTest是 axios 自訂的函式,它會回傳一個檢查特定類型的函式,若 type 是 URLSearchParams,則此函式最終會檢查一個值(thing)是否是 URLSearchParams 類型的 instance:
const kindOfTest = (type) => { type = type.toLowerCase(); return (thing) => kindOf(thing) === type // 回傳一個函式,確認是否為特定 type}kindOf 也是 axios 自訂的函式,它會回傳某個值的 instance,因此 kindOfTest就可用它來檢查某個值是否為該 instance。
const {toString} = Object.prototype;const kindOf = (cache => thing => { const str = toString.call(thing); return cache[str] || (cache[str] = str.slice(8, -1).toLowerCase());})(Object.create(null));乍看 kindOf 會不太理解在做什麼,因此我們來逐步拆解 kindOf :
- 呼叫
toString- 當
Object.prototype.toString被調用在一個物件上時,會回傳[object Type]格式的字串。例如對於URLSearchParams物件,會回傳[object URLSearchParams]
- 當
- 字串處理
str.slice(8, -1)會去掉[object和最後的],因此[object URLSearchParams]會變成URLSearchParams
- 緩存機制
- 以
Object.create(null)建立一個純淨的物件作為緩存,也就是這次執行、判斷的結果會被緩存起來,提高後續呼叫的效能
- 以
回來看 isURLSearchParams,當我們呼叫它時,會經過這種流程:
// 當我們呼叫 isURLSearchParams 時...const params = new URLSearchParams();isURLSearchParams(params);
// 內部發生的過程:// 1. toString.call(params) 回傳 "[object URLSearchParams]"// 2. slice(8, -1) 得到 "URLSearchParams"// 3. toLowerCase() 得到 "urlsearchparams"// 4. 與傳入的 type 比較,回傳 true
看到這裡時,覺得真神奇,但還是有幾個疑問,和 ChatGPT 討論後得到解答,因此也一併記錄下來。
Q1: 為什麼 kindOf 是用 Object.prototype.toString.call() 而不是 Object.prototype.toString()?
直接呼叫 object.toString() 時,大多數物件都會覆蓋繼承自 Object.prototype 的 toString 方法,舉例如下。
const arr = [1, 2, 3];arr.toString()  // 回傳 "1,2,3"
const date = new Date();date.toString() // 回傳像 "Mon Jan 01 2024 12:00:00 GMT+0800" 這樣的字串而Object.prototype.toString 的原始實現會回傳物件的內部 [[Class]] 屬性,根據 MDN 文件 Object.prototype.toString() 所述,裡面的確有提到:「To use the base Object.prototype.toString() with an object that has it overridden (or to invoke it on null or undefined), you need to call Function.prototype.call() or Function.prototype.apply() on it, passing the object you want to inspect as the first parameter (called thisArg).」
使用 call 和直接呼叫 toString 差異的範例程式如下:
// 使用 callObject.prototype.toString.call([1, 2, 3])     // "[object Array]"Object.prototype.toString.call(new Date())    // "[object Date]"Object.prototype.toString.call(new URLSearchParams()) // "[object URLSearchParams]"
// 直接呼叫 toString[1, 2, 3].toString()      // "1,2,3"new Date().toString()     // "Mon Jan 01 2024 12:00:00 GMT+0800"
Q2:為什麼 kindOf 要用 Object.prototype.toString.call() 判斷 instance 而不是 instanceof?
- 跨域(Cross-realm)支援
// 在 iframe 情境const iframe = document.createElement('iframe');document.body.appendChild(iframe);const iframeArray = iframe.contentWindow.Array;const arr = new iframeArray();
// Object.prototype.toString.call()toString.call(arr)  // '[object Array]' → 正確識別
// instanceofarr instanceof Array // false → 無法正確識別跨域物件- 原始型別(Primitives)處理
// Object.prototype.toString.call()toString.call('string')  // '[object String]'toString.call(123)      // '[object Number]'toString.call(true)     // '[object Boolean]'
// instanceof'string' instanceof String // false123 instanceof Number // falsetrue instanceof Boolean // falsenull和undefined處理
// Object.prototype.toString.call()toString.call(null)      // '[object Null]'toString.call(undefined) // '[object Undefined]'
// instanceofnull instanceof Object    // falseundefined instanceof Object // false
總結來說,使用 toString.call(thing) 可以確保更一致性的行為,在不同執行環境有一致的行為,且不受原型鏈影響,對原始型別也有更可靠的檢查。
Q3:如果只需檢查 FormData、Blob 和 ArrayBuffer,toString.call(thing) 和 instanceof 有差異嗎?
會想針對 FormData、Blob 和 ArrayBuffer 確認,是因為目前公司有個專案有用 instanceof 來檢查資料是否為 FormData、Blob 或 ArrayBuffer,想知道用 instanceof 是否足夠完善。
對於這三種特定類型,兩種方法的差異較小,可看以下:
// 兩種方法都可行const formData = new FormData();const blob = new Blob([]);const arrayBuffer = new ArrayBuffer(8);
// 方法 1: Object.prototype.toString.call()toString.call(formData)    // '[object FormData]'toString.call(blob)        // '[object Blob]'toString.call(arrayBuffer) // '[object ArrayBuffer]'
// 方法 2: instanceofformData instanceof FormData       // trueblob instanceof Blob               // truearrayBuffer instanceof ArrayBuffer // true
為什麼差異較小呢? 主要原因是:
- 都是建構函式建立的實例(不是原始型別)
- 都是內建型別
- 一般使用時較少跨域情境
唯一主要差異在於跨域情境,但不多見,所以可暫時忽略。
// 在 iframe 中const iframe = document.createElement('iframe');document.body.appendChild(iframe);const iframeFormData = new iframe.contentWindow.FormData();
// Object.prototype.toString.call() - 可運作toString.call(iframeFormData) === '[object FormData]'  // true
// instanceof - 可能失敗iframeFormData instanceof FormData // 在某些瀏覽器中會是 false因此,如果是框架/函式庫開發,那使用Object.prototype.toString.call() 來確認會更安全一致;如果是一般應用開發,這三種類型用 instanceof 就足夠了。
小結#
小結一下 URL 編碼的部分,axios 在我們呼叫 axios.get 這類 request function 時,會用 buildURL 幫我們將基礎 URL 和 params 物件組合成一個完整的 URL,它會正確處理參數的編碼、移除錨點(#)、處理已存在的查詢參數(?),確保生成的 URL 格式正確且安全 👍
而此篇文章主要看了 axios instance 的原始碼,以及 axios URL 編碼是在哪裡被呼叫、詳細邏輯如何實作的,也補充了Object.prototype.toString.call() 這種用來確認物件 instance 的方式。下一篇會介紹 axios 中請求與回應資料的轉換,以及錯誤處理方式。
Reference:#
- https://github.com/axios/axios
- https://ithelp.ithome.com.tw/articles/10289064
- https://ithelp.ithome.com.tw/articles/10244631
- https://hackmd.io/@myrealstory/B1rSnt-NC
- https://mini-ghost.dev/posts/axios-source-code-1
- https://mini-ghost.dev/posts/axios-source-code-2
- https://www.cnblogs.com/JohnTsai/p/axios.html
如有任何問題歡迎聯絡、不吝指教✍️